 English
 Română
How to Build a Multilingual Website with Django i18n
How to Build a Multilingual Website with Django i18n
Introduction
Django is a very powerful Python library used to create web applications. If you have heard about Django, you might have heard the term "Batteries Included". What that means is that Django comes with a set of built-in tools for developers to use right away to build complex applications. One of the tools we are going to explore today is the Django Internationalization module, or for short, i18n. This module is used to easily create and manage different language versions of your website. That is very handy if you want to offer your website to multiple audiences in their native languages and don't want to rely on somewhat inconsistent automatic Google translations or other third-party tools. When using Django translation, you control what text appears on your page, and there can be no surprises, as can sometimes happen with automatic translations, since they might not translate the text exactly as you intend.
In this tutorial, we will explore how to enable Django’s translation machinery and how to create some simple translations to get a hang of it, so that you can use this knowledge as a base and apply it to your own websites. Let’s get started.
For this tutorial, I will make a couple of assumptions so that I can provide the exact commands (given the known folder structure):
- You are executing this code in Web Development Sandbox on Bytestark.com
- You are using the existing Django example in the /examples/django_sample_1 folder.
- Your starting folder when you open the Web Development Sandbox is /home/coder/learning. When paths are referenced, they will be relative to this root path.
Enabling the translation Engine
Everything we can change in a Django project to customize it is located in the settings file; therefore, we need to locate the corresponding settings.py for our project.
This file is location is /examples/django_sample_1/django_sample_1/settings.py.
Let's open it and examine the translation related settings.
Note: This version of settings.py, while it was pre-generated, is almost default, as you would get from a fresh django-admin startproject new run.
Therefore, the settings you see in this file would be almost the same for any other fresh Django project.
Search for the setting called USE_I18N. This setting is True by default, but it's always good to check in case it was changed accidentally during the project's lifecycle.
This setting controls the translation functionality in Django.
Setting it to False will disable everything related to translation and localization and will not even load the related components, improving your website's performance.
If you are not using translation, it's advisable to turn it off, but in our case, we will keep it on as we want to explore translation capabilities.
Another setting that we want to take a look at is LOCALE_PATHS. This setting controls where the resulting translation files will be located for Django to load.
Usually, this folder is located at the root of your Django project for ease of access, so setting it as shown below is sensible:
LOCALE_PATHS = [
    BASE_DIR / "locale"
]
Next, we have to specify the languages we want to use for our website. Let's start simple and offer our mock website in English and Spanish.
To set the list of languages, we use the LANGUAGES setting, as shown below:
LANGUAGES = [
    ("en", _("English")),
    ("es", _("Spanish")),
]
You might have noticed the strange _("English") notation in the snippet above and might be wondering what it is. This syntax is a convention for indicating which strings need to be translated in your Django source code, and in reality, there's nothing strange or fancy about it, as it's simply an import of the respective translation functions. We need to add the following import at the top of our settings.py file to make it work:
from django.utils.translation import gettext_lazy as _
Django's translation system relies on GNU gettext toolset, this is why we need to import the function gettext_lazy - it's a Python wrapper for GNU gettext toolset.
Creating translation files
Now that we have enabled and configured Django's translation system, let's create the actual translation files that will be used to load and display your text on the web page. To create the corresponding translation files, we need to tell Django which languages we want to process using the following management command:
python3 manage.py makemessages --locale en
Running this command will display the following message:
processing locale en
Do the same for all the configured languages in your settings file
python3 manage.py makemessages --locale es
Running this command will display the following message:
processing locale es
After running these commands your folder structure should like the one shown in the image below:

The commands above created the folder locale as we configured in settings.py via the LOCALE_PATHS setting, and also added a folder corresponding to each of the
configured languages, in this case en and es. Inside each of these folders, we can see that Django created a subfolder LC_MESSAGES and a file named django.po.
These django.po files are the core translation files in the GNU gettext Portable Object format.
They will contain all the strings marked for translation and their respective translated counterparts.
Let's open any of the files and see its format.
# SOME DESCRIPTIVE TITLE.
# Copyright (C) YEAR THE PACKAGE'S COPYRIGHT HOLDER
# This file is distributed under the same license as the PACKAGE package.
# FIRST AUTHOR <EMAIL@ADDRESS>, YEAR.
#
#, fuzzy
msgid ""
msgstr ""
"Project-Id-Version: PACKAGE VERSION\n"
"Report-Msgid-Bugs-To: \n"
"POT-Creation-Date: 2026-01-18 12:02+0000\n"
"PO-Revision-Date: YEAR-MO-DA HO:MI+ZONE\n"
"Last-Translator: FULL NAME <EMAIL@ADDRESS>\n"
"Language-Team: LANGUAGE <LL@li.org>\n"
"Language: \n"
"MIME-Version: 1.0\n"
"Content-Type: text/plain; charset=UTF-8\n"
"Content-Transfer-Encoding: 8bit\n"
"Plural-Forms: nplurals=2; plural=(n != 1);\n"
#: django_sample_1/settings.py:111
msgid "English"
msgstr ""

#: django_sample_1/settings.py:112
msgid "Spanish"
msgstr ""
This is the most basic translation file that, at the top, contains the file's metadata, where you can add your own project's details, but that is used for human benefit rather than being useful for the translation itself. What is useful is this part:
#: django_sample_1/settings.py:111
msgid "English"
msgstr ""
This block represents the actual translatable unit of text that we have marked in our code and makemessages parsed after scanning the code.
Remember we have used ("en", _("English")) in our settings.py file and used gettext_lazy as _ to tell Django that these strings should be translated before rendering on the page. This is why in our django.po file we can see these 2 entries: English and Spanish.
In any translation block in the .po we will have the following fields:
- #: django_sample_1/settings.py:111 - This indicates the location of the string within our project's files.
- msgid "English" - msgid represents the actual string as parsed from the code.
- msgstr "" - Here we will add our translated version of the
msgidfor the corresponding language.
Let's add our translations for this basic django.po file.
But which file should we add these translations to if we have 2 django.po versions?
It depends on your primary language. In our case, the primary language is English and Spanish is
secondary, so we will have to add Spanish
versions of the strings in /locale/es/LC_MESSAGES/django.po.
We could have skipped the creation of /locale/en/LC_MESSAGES/django.po altogether since English is the primary language and there's no point in adding English-to-English translations,
but we have created the file for demonstration purposes, so for this tutorial it will remain empty.
Let's update the /locale/es/LC_MESSAGES/django.po file by adding the following translated versions:
#: django_sample_1/settings.py:111
msgid "English"
msgstr "Inglés"

#: django_sample_1/settings.py:112
msgid "Spanish"
msgstr "Español"
Now, this file is for users to fill in with translations, but this is not the file that Django will use. For that, we will need to compile the messages into a binary file that is both easier for Django to parse and much faster. To compile the translation files, we use:
python3 manage.py compilemessages
If the command is successful we should see the following output:
processing file django.po in /home/coder/learning/examples/django_sample_1/locale/en/LC_MESSAGES
processing file django.po in /home/coder/learning/examples/django_sample_1/locale/es/LC_MESSAGES
After this command is executed we can see that in each folder where we have our translation django.po files we have a new file named django.mo.
This file is a binary file containing all the translations for Django to load and use at runtime. This file is a Machine Object file and we don't have to manually tweak it.
Every time we update the django.po file we have to recompile the translation using the command compilemessages and this will recreate the django.mo files.
Using the translation on the website
Now we have our translation files, but they are not useful as we don't have a
multilingual webpage to display this translated text on, so let's create a small page
that will contain some elements worth translating.
Open the file /django_sample_1/home/templates/home/home.html and replace the content with the code below:
<!DOCTYPE html>
<html>
<head>
    <meta charset="UTF-8">
    <title>My Homepage</title>
    <style>
        .container {
            display: flex;
            justify-content: center;
            padding: 20px;
            flex-direction: column;
            font-weight: 700;
        }
        .header {
            display: flex;
            justify-content: space-between;
            align-items: center;
            width: 100%;
            margin-bottom: 20px;
        }
        .menu {
            display: flex;
            gap: 15px;
        }
        .logo {
            text-decoration: none;
            color: #000000;
            font-size: 24px;
            font-weight: bold;
        }
        .logo:hover {
            color: #fa2311;
        }
        .content {
            display: flex;
            flex-direction: column;
            gap: 20px;
        }
        button {
            margin-top: 10px;
        }
        input[type="text"],
        input[type="email"],
        textarea {
            padding: 8px;
            font-size: 16px;
        }
    </style>

    <script>
        function register_user(){
            let message = document.getElementById("message");
            let user_name = document.getElementById("name");
            let user_email = document.getElementById("email");
            let new_content = `<p>Hello ${user_name.value}. Please check your email address ${user_email.value} where we have sent log in instructions.</p>`;
            if (!user_name.value || !user_email.value){
                new_content = "<p>Name or Email not provided. Please fill in the form</p>";
            }
            message.innerHTML = new_content;
        }
    </script>
</head>
<body>
    <div class="header">
        <a href="#" class="logo">Django i18n</a>
        <div class="menu">
            <a href="#home" class="logo">Home</a>
            <a href="#about" class="logo">About</a>
            <a href="#contact" class="logo">Contact</a>
        </div>
    </div>

    <div class="container">
        <div class="content">
            <label for="name">Name:</label>
            <input type="text" id="name" name="name" placeholder="Enter your name"/>

            <label for="email">Email:</label>
            <input type="email" id="email" name="email" placeholder="Enter your email"/>

            <button class="btn btn-success" type="submit" onclick="register_user()">Submit</button>
        </div>

        <div id="message"></div>
    </div>
</body>
</html>
After we have added this code let's start the Django server and take a look at our page. To run the server use:
python3 manage.py runserver
This will start the development server and VSCode will display a pop-up message that our website is accessible and whether we want to open it. Click to open.
Your homepage should look like the one below:
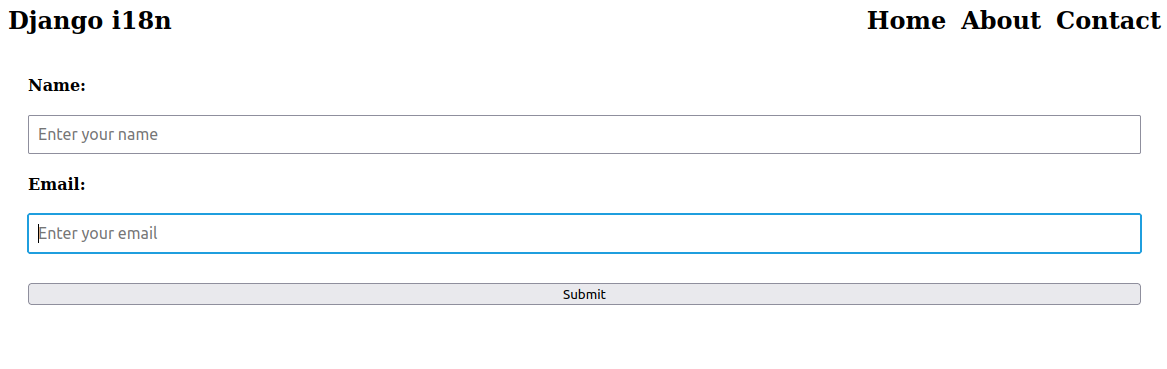
This version of the homepage will be our default version, which is English, but currently there's no way for us to switch to Spanish version. Let's fix this.
There are multiple ways of creating multilingual websites, such as switching languages based on a query parameter or creating a completely separate website
instance that serves a different audience, but in this tutorial, we will explore a simpler version that is also efficient and works well with search engines,
as they understand this structure quite well, and that is a URL path-based structure.
We will have our website serve the default language at the root location or /en, and the Spanish version at /es.
All the URLs on the website will be automatically prefixed with the language code en or es, depending on our selection.
This makes navigation understandable for both users and search engines. Let's see how we can achieve this.
Open settings.py file and locate the LANGUAGE_CODE setting. Currently it is using the default value, which should be:
LANGUAGE_CODE = 'en-us'
What this setting will do is serve our pages and use the language code plus region code as the prefix for the language, so for en-us we will have /en-us/page1..., which is not
what we want right now. We want to have just the language code and not bother with the region. Both options are viable, but using a language plus region code versus simply a
language code falls outside the scope of this tutorial and might be explored at a later time.
What is worth noting is that Django doesn't care which option we use, as it's a matter of what we need and how we configure it.
Where it will have a slight impact is in SEO, but per Google Search documentation, a language code will be sufficient in most cases, so we are going with this approach.
Let's adjust this setting and remove the region code, so the setting now becomes:
LANGUAGE_CODE = 'en'
Now that we have configured the language code let's enable the language switch at the URL level.
For this we will have to update the /django_sample_1/django_sample_1/urls.py and update the code as follows:
from django.contrib import admin
from django.urls import path, include
from django.conf.urls.i18n import i18n_patterns

urlpatterns = [
    path('admin/', admin.site.urls),
]

urlpatterns += i18n_patterns(
    path('', include("home.urls")),
)
What we did here is let Django know that all the paths in the i18n_patterns list will need to be prefixed with the language code, as they are going to use translation,
whereas the paths in url_patterns will not be translated. For this example, we are translating only the user-facing pages, as defined in our home.urls,
but we do not want to translate the admin app. Although we could if we wanted,
I just wanted to highlight that we can use a hybrid approach and choose which paths are going to be prefixed with a language code and which will not.
Just keep in mind not to confuse your users while using this approach. The admin interface should not be user-facing, so keeping it untranslated is acceptable.
Now that we've enabled URL rewrite using language code let's try to access our 2 versions of the website. After we have updated the urls.py file the server should have automatically
refreshed the website, if not, just stop and start the server again.
Now our website should not be available at the root location / but navigating to /en/ should open our homepage. Let's try to access the Spanish version by navigating to /es/.
Did you get Page not found (404) error?
Why does this happen if we have seemingly enabled translation everywhere? The answer is the translation Middleware.
We must add the locale middleware to enable automatic path rewrite with the correct language code prefix. In the settings.py file locate the setting MIDDLEWARE
and add to the list the following middleware.
Note that middlewares must be in a specific order, otherwise the application might have unexpected behavior or completely not work.
'django.middleware.security.SecurityMiddleware',
'django.contrib.sessions.middleware.SessionMiddleware',
'django.middleware.locale.LocaleMiddleware', # <--- this was missing
# ...
Accessing the /es version of the site should now work, but wait... it still appears in English.
That is because we have added the content on the page, but we didn't translate anything, so let's now work on the actual translations.
Open the source code for our homepage in the home.html and let's explore how we can mark strings for translation.
The first thing we must do in a Django template to enable on-page translation is to load the i18n module into the template file. Add the following line at the top of the home.html:
{% load i18n %}
Next, to mark a string for translation we need to use a special template tag called trans as shown below:
{% trans "TEXT" %}
So what we are going to do now is to replace each string in the template with their {% trans %} counterpart. You can do it manually to get a better hang of the syntax or just paste the following code into your home.html template:
{% load i18n %}
<!DOCTYPE html>
<html>
<head>
    <meta charset="UTF-8">
    <title>{% trans "My Homepage" %}</title>
    <style>
        .container {
            display: flex;
            justify-content: center;
            padding: 20px;
            flex-direction: column;
            font-weight: 700;
        }
        .header {
            display: flex;
            justify-content: space-between;
            align-items: center;
            width: 100%;
            margin-bottom: 20px;
        }
        .menu {
            display: flex;
            gap: 15px;
        }
        .logo {
            text-decoration: none;
            color: #000000;
            font-size: 24px;
            font-weight: bold;
        }
        .logo:hover {
            color: #fa2311;
        }
        .content {
            display: flex;
            flex-direction: column;
            gap: 20px;
        }
        button {
            margin-top: 10px;
        }
        input[type="text"],
        input[type="email"],
        textarea {
            padding: 8px;
            font-size: 16px;
        }
    </style>

    <script>
        function register_user(){
            let message = document.getElementById("message");
            let user_name = document.getElementById("name");
            let user_email = document.getElementById("email");
            let new_content = `<p>{% blocktrans %}Hello ${user_name.value}. Please check your email address ${user_email.value} where we have sent log in instructions{% endblocktrans %}.</p>`;
            if (!user_name.value || !user_email.value){
                new_content = '<p>{% trans "Name or Email not provided. Please fill in the form" %}</p>';
            }
            message.innerHTML = new_content;
        }
    </script>
</head>
<body>
    <div class="header">
        <a href="#" class="logo">Django i18n</a>
        <div class="menu">
            <a href="#home" class="logo">{% trans "Home" %}</a>
            <a href="#about" class="logo">{% trans "About" %}</a>
            <a href="#contact" class="logo">{% trans "Contact" %}</a>
        </div>
    </div>

    <div class="container">
        <div class="content">
            <label for="name">{% trans "Name" %}:</label>
            <input type="text" id="name" name="name" placeholder='{% trans "Enter your name" %}'/>

            <label for="email">{% trans "Email" %}:</label>
            <input type="email" id="email" name="email" placeholder='{% trans "Enter your email" %}'/>

            <button class="btn btn-success" type="submit" onclick="register_user()">{% trans "Submit" %}</button>
        </div>

        <div id="message"></div>
    </div>
</body>
</html>
Now with all the strings marked for translation we need to regenerate the translation file using the command we are already familiar with:
python3 manage.py makemessages --all
After initial file generation we can use the --all flag to scan the local files
again and extract the strings we have marked for translation for all enabled languages.
If we open the django.po file from the es folder it will contain all the strings we need to translate.
#: django_sample_1/settings.py:112
msgid "English"
msgstr "Inglés"

#: django_sample_1/settings.py:113
msgid "Spanish"
msgstr "Español"

#: home/templates/home/home.html:6
msgid "My Homepage"
msgstr ""

#: home/templates/home/home.html:62
#, python-brace-format
msgid ""
"Hello ${user_name.value}. Please check your email address ${user_email."
"value} where we have sent log in instructions "
msgstr ""

#: home/templates/home/home.html:64
msgid "Name or Email not provided. Please fill in the form"
msgstr ""

#: home/templates/home/home.html:74
msgid "Home"
msgstr ""

#: home/templates/home/home.html:75
msgid "About"
msgstr ""

#: home/templates/home/home.html:76
msgid "Contact"
msgstr ""

#: home/templates/home/home.html:82
msgid "Name"
msgstr ""

#: home/templates/home/home.html:83
msgid "Enter your name"
msgstr ""

#: home/templates/home/home.html:85
msgid "Email"
msgstr ""

#: home/templates/home/home.html:86
msgid "Enter your email"
msgstr ""

#: home/templates/home/home.html:88
msgid "Submit"
msgstr ""
Now add the corresponding Spanish translations:
#: django_sample_1/settings.py:112
msgid "English"
msgstr "Inglés"

#: django_sample_1/settings.py:113
msgid "Spanish"
msgstr "Español"

#: home/templates/home/home.html:6
msgid "My Homepage"
msgstr "Mi Página Principal"

#: home/templates/home/home.html:62
#, python-brace-format
msgid ""
"Hello ${user_name.value}. Please check your email address ${user_email.value} where we have sent log in instructions "
msgstr ""
"Hola ${user_name.value}. Por favor, verifica tu dirección de correo electrónico ${user_email.value}, donde hemos enviado las instrucciones de inicio de sesión "

#: home/templates/home/home.html:64
msgid "Name or Email not provided. Please fill in the form"
msgstr "Nombre o correo electrónico no proporcionado. Por favor, completa el formulario"

#: home/templates/home/home.html:74
msgid "Home"
msgstr "Inicio"

#: home/templates/home/home.html:75
msgid "About"
msgstr "Acerca de"

#: home/templates/home/home.html:76
msgid "Contact"
msgstr "Contacto"

#: home/templates/home/home.html:82
msgid "Name"
msgstr "Nombre"

#: home/templates/home/home.html:83
msgid "Enter your name"
msgstr "Ingresa tu nombre"

#: home/templates/home/home.html:85
msgid "Email"
msgstr "Correo electrónico"

#: home/templates/home/home.html:86
msgid "Enter your email"
msgstr "Ingresa tu correo electrónico"

#: home/templates/home/home.html:88
msgid "Submit"
msgstr "Enviar"
And recompile the translations using:
python3 manage.py compilemessages
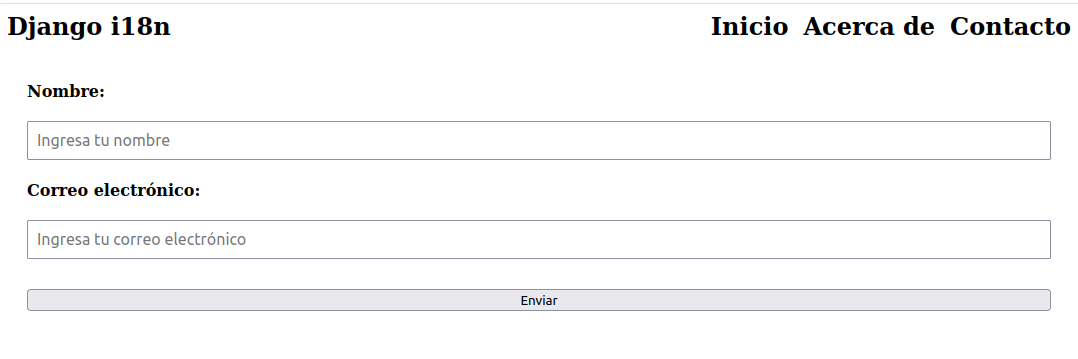
If we try to access the page /es now it should have all the strings properly translated according to our translation file as shown in the image below:
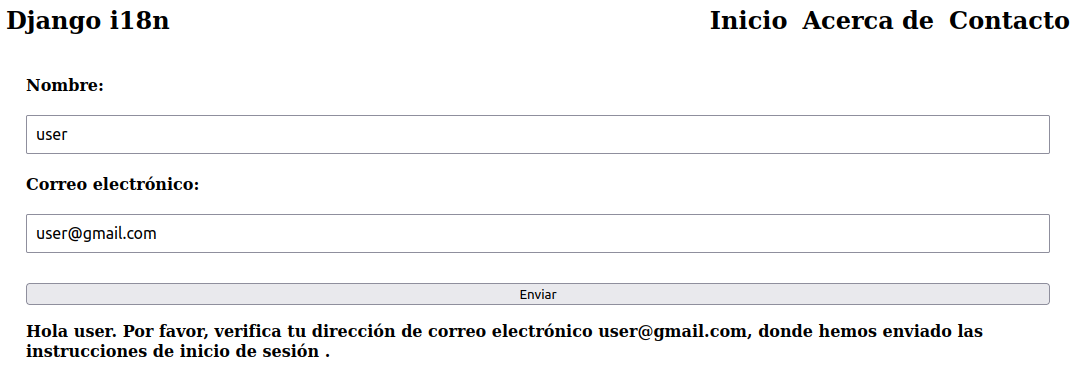
Let's try to submit the form on the page and see what happens.
Add a fake name and email address and press submit. You should see that the displayed message is also translated, even though that message is rendered by JavaScript.
Since the whole template is parsed by Django before the JavaScript is loaded, the strings will be replaced accordingly, so JavaScript doesn't even know that those
strings are dynamic and are enclosed in {% trans %} or {% blocktrans %}. This works because this JavaScript code is inline in the HTML; if it were a separate .js file
loaded into the HTML template, this approach would not work, and we would need to adjust our method accordingly.
We'll probably explore JavaScript-specific translation in another tutorial.
The message displayed should look like below:
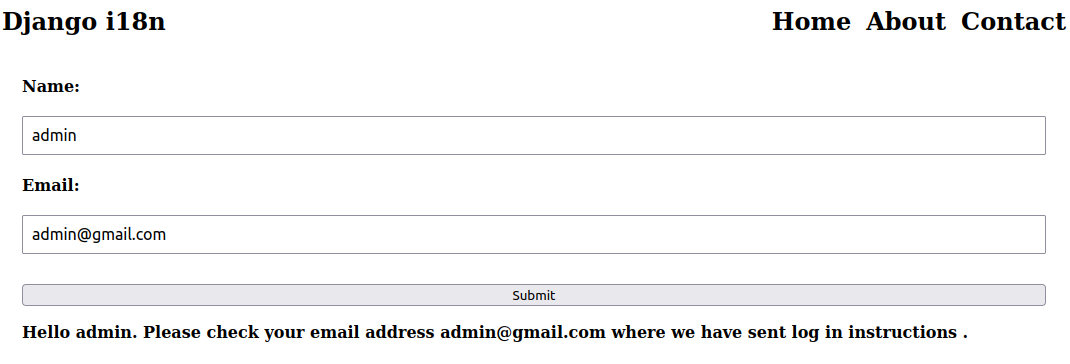
If we try to switch to English version of the site and submit another form it should display the message correctly, as we expect, in English:
One last thing to discuss from the example above is the usage of the tag blocktrans in the line:
let new_content = `<p>{% blocktrans %}Hello ${user_name.value}. Please check your email address ${user_email.value} where we have sent log in instructions {% endblocktrans %}.</p>`;
{% blocktrans %} performs essentially the same function as {% trans %}, but whereas {% trans %} can only be used for simple static strings, {% blocktrans %}
can contain logic and variables. Therefore, we had to use the block translation tag, as we interpolated the ${user_name.value} and ${user_email.value} variables.
When using {% blocktrans %} don't forget that you must close this tag using {% endblocktrans %} otherwise your server will raise an exception.
Summary
In this tutorial, we have explored the basic concepts of how to use Django's translation system to create multilingual websites. There are other concepts that we didn't cover in this tutorial, such as using translated text in the context that can be passed from the backend to the template, or how entries from the database can be translated and rendered on the page. However, in the interest of keeping this tutorial relatively short and focused, we've omitted those concepts and others that may be too many to mention here. This tutorial should cover sufficient ground to gain a good understanding of the basics and get started exploring solutions on your own that apply to your websites.